On Friday, we unwrapped the adorable book, Mousekin's Christmas Eve, by Edna Miller.
This is an older book that I checked out from our school library. The sweet little mouse in the story "loses" his home, and has to go searching for a new one. He goes out into the cold, snowy night where he is uncomfortable and scared of predators. He is surprised by the colored lights coming from a Christmas tree. He sneaks into the warm house, climbs all over the Christmas tree, and finds a new cozy place to sleep inside the nativity scene. I loved this book, because it was appropriate to read in the public school classroom, but also had a very strong message about finding peace and comfort at Christmas time. I was kind of surprised, but my kiddos LOVED it! 27 thumbs up for this one!
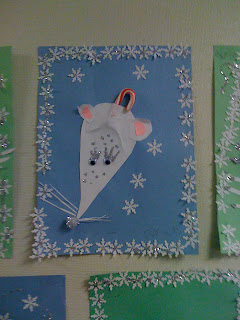
After reading, we made our own "mousekins" out of paper. I saw a picture of this project on Flickr and pinned it to my pinterest. Here are our version of the project, and the directions I came up with:
You need: construction paper backgrounds (I chose blue and green to represent more "wintery" scenes, plain white sheets of paper per child, one 1/2 sheet of white construction paper per child, two 2 1/4" white squares per child, two 1 1/4" white squares per child, scraps to make whiskers from, mini candy canes, pom-pom noses ( I used pink, red sparkly, and silver), google eyes, snowflake punch-outs (I bought the punch at Hobby Lobby - 40% off right now!), and silver glitter.
1- Teach your students how to draw a "tear-drop" shape for the mouse's body. I had mine fold a plain white paper in half "hamburger style", start in a corner, and draw the teardrop. We practiced four times. I tried to emphasize making it wider at the bottom.
2- After practicing, we drew our "final" teardrop shape on a half sheet of white construction paper, and cut out. (Cute that some of the mice look a little like rats because of their long shapes, but that's what makes this project so special! It is 100% student work.)
3- Glue the tear drop shape onto construction paper backgrounds. I let my kids choose where to put it. The paper could be vertical/horizontal. I wanted it to be theirs, so I didn't make any rules. Make sure students don't glue down the "bottom" of the rat, so they can slide a candy cane there.
4- The hard part was the candy cane - We unwrapped it and used bottle glue to glue it down. Students did a LOT of counting. We learned that we had to have patience. If we moved it too much, it made our papers red and icky. If we pulled on it to check if it was dry, it pulled out. We had to just leave it and let time make it stick.
5- Next, we made the ears. We rounded out the squares of white and pink, glued them on halfway, and folded the ears up. We left room for eyes and a nose. (Some kids can't see this, and need help to keep from gluing the ears onto the nose.)
6- Next, students glued on the google eyes and pom-pom noses. (This was another lesson in patience. If you pull up your pom-pom to check if it is sticking, it will not stick, and you lose all of your glue.)
7- We used scraps of white paper to cut whiskers. I really liked the thin whiskers in the picture above. Most were a little thicker. Again, everyone's were different.
8- Next, students glued on the snowflake cut-outs made with my punch from Hobby Lobby. I told them to make a "frame", but I also gave them license to do it their own way.
9- We added glitter. Students had a great time. I gave an example of adding some to make eyelashes, and sparkle on the whiskers, and some in the snowflakes, and told them to use caution because too much and it might not be pretty anymore. Some did a little more than that, but overall they turned out adorable!
It was a great way to spend a Friday morning, and I felt like the students had a chance to exercise their creativity, as well as patience!


No comments:
Post a Comment